
MakerGuide
Explore the full MakerGuide, featuring a parts list, 3D printing guide, assembly steps, usage instructions, and tips for evolving the design.
In this Make:able toolkit, we’ll be guiding you through the process of preparing your design for open source sharing. Watch the overview video below before exploring the sections to learn how to refine your prototype, document your work, and submit your open source files for global impact.
Before preparing your own design for open source sharing, explore how others have done it. The examples in this section feature assistive devices designed by PrintLab that have been released openly, showcasing the power of documentation and collaboration in extending a design’s impact beyond its original user. Each example includes the core components of 3D printable open source models. Refer back to this section as a checklist once you’re ready to launch your own product into the world.
Each example begins with a short product description and design context – outlining what the device does, who it’s for, and the thinking behind key design decisions. This information provides essential background for anyone looking to understand, reproduce, or adapt the design.
A selection of images that highlight the device’s purpose, features, and use in action. These visuals help others quickly understand the function and design intent before diving into technical details.
The MakerGuide is the main resource for open source sharing — a clear, visual document that shows others how to make, use, and adapt your design. In creating a MakerGuide, you’ll naturally tick many of the key boxes for releasing open source models, such as selecting a licence type, explaining your design rationale, outlining materials and processes, and more. We’ll be looking at MakerGuides in more detail later on, so don’t worry if you don’t understand everything as you look through the examples.
Downloadable 3D design and build files that allow others to recreate or evolve the device for different needs. Each example includes both printable files (such as STL or 3MF) and raw editable design files (for example, Tinkercad or Fusion 360 formats).
A short video can help others quickly understand the device and its purpose. Each example includes one, but it’s an optional element you may choose to create when preparing your own open source design.
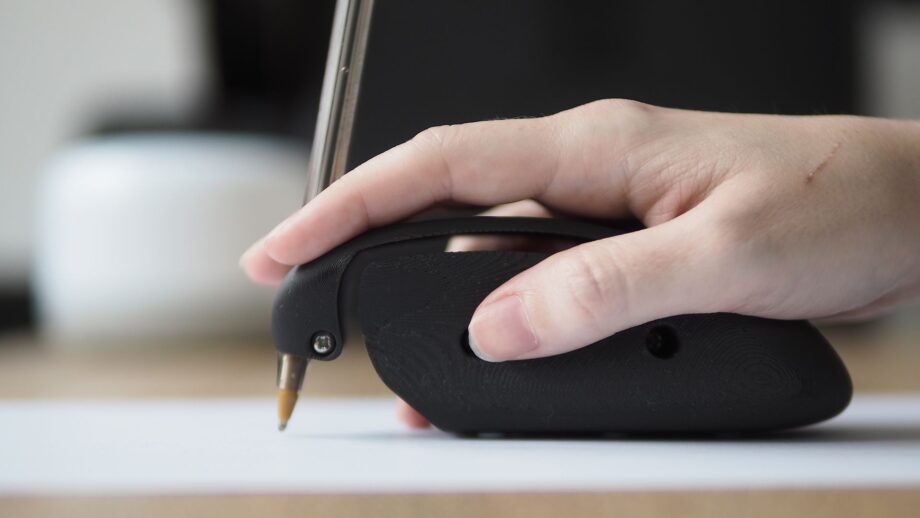
DRAG is an assistive device that enables users to write or draw without having to form a tight closed grip with their fingers. Simply rest your hand on the ergonomic mouse-shaped body, then press and DRAG.
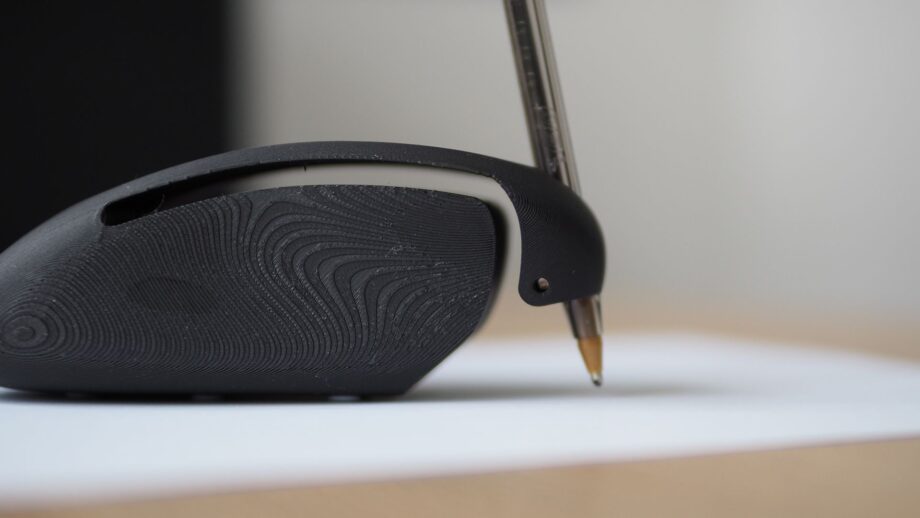
DRAG is designed for individuals with arthritis, reduced hand strength, or mobility challenges that make gripping writing tools difficult.
Traditional pens and pencils can cause discomfort or pain—DRAG offers a comfortable alternative that supports independence and creativity.
Users rest their hand on the device and press down to write or draw. Its symmetrical design makes it suitable for both left and right-handed users.
Explore the full MakerGuide, featuring a parts list, 3D printing guide, assembly steps, usage instructions, and tips for evolving the design.

Access the printable and editable design files, allowing you to both build and/or adapt the design.
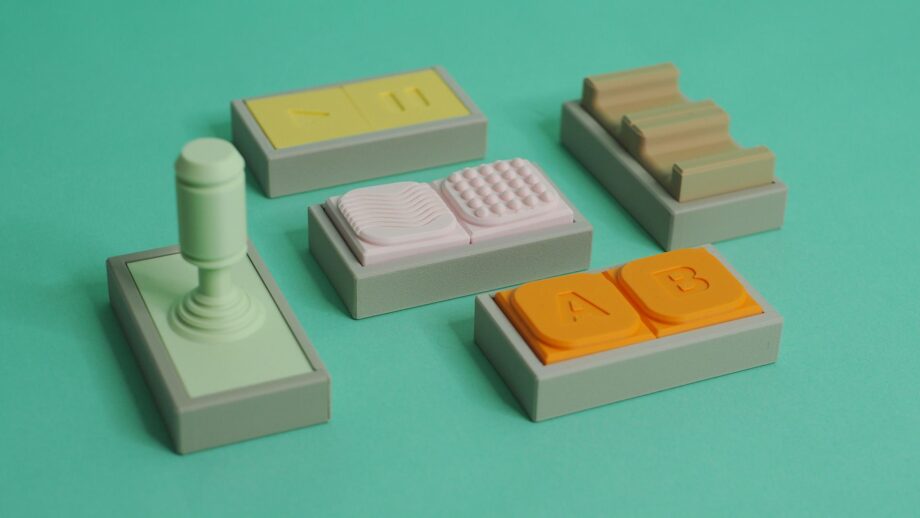
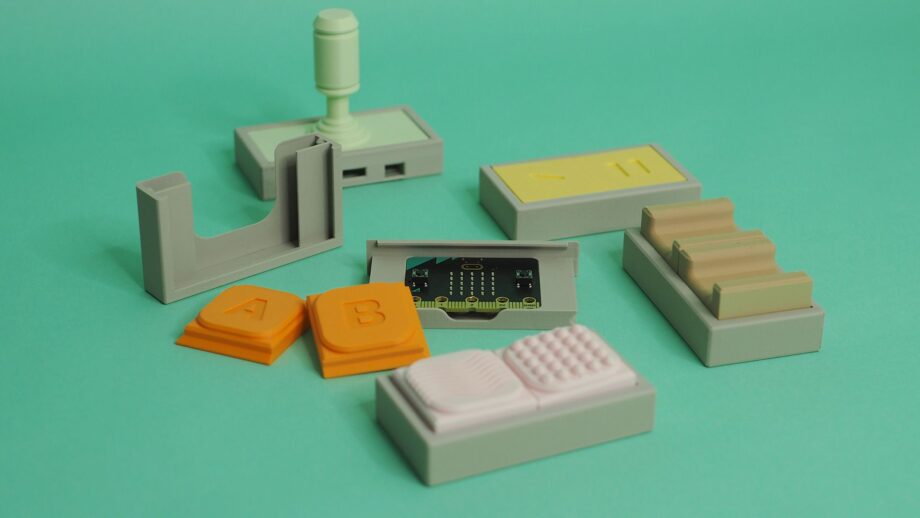
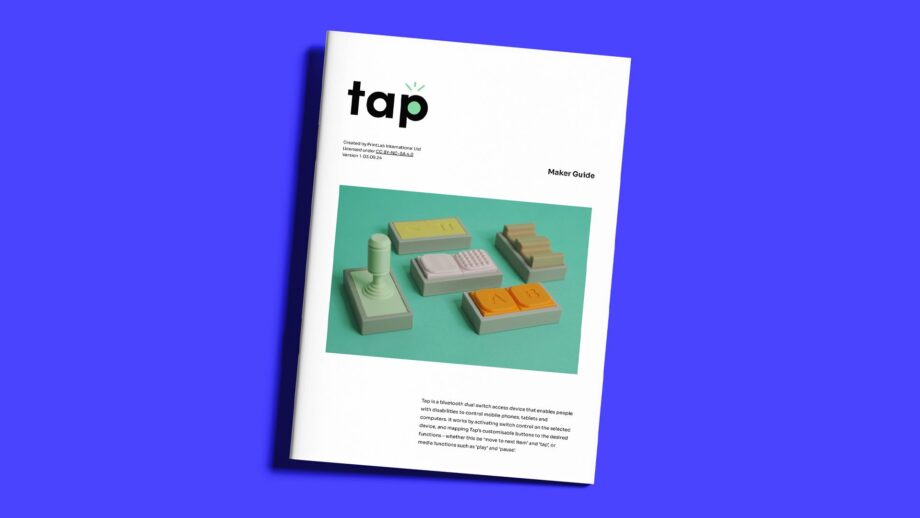
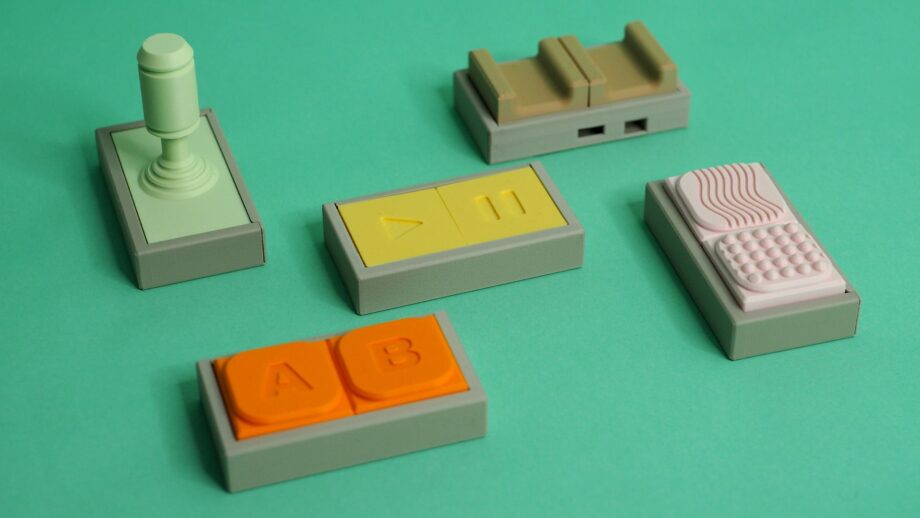
Tap is a bluetooth dual switch access device that enables people with disabilities to control mobile phones, tablets and computers. It works by activating switch control on the selected device, and mapping Tap’s customisable buttons to the desired functions – whether this be ‘move to next item’ and ‘tap’, or media functions such as ‘play’ and ‘pause’.
Tap is designed for people who have limited hand mobility and struggle to use traditional input methods for computer devices, such as keyboard and mouse, small buttons or touchscreens.
It aims to empower individuals with physical and cognitive impairments to interact with technology, engage with their surroundings, and enhance their independence.
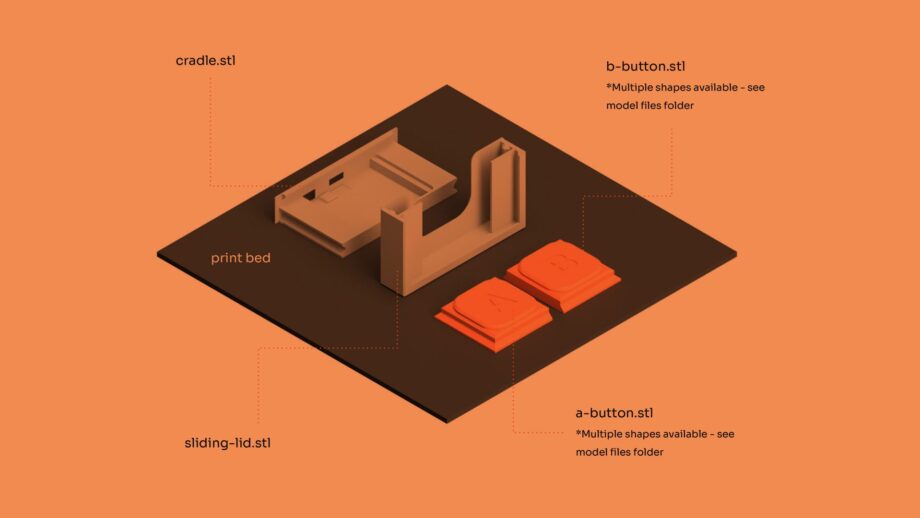
A Micro:bit v2 pocket-sized computer powers the device, sending ‘tab’ when button A is pressed and ‘enter’ when button B is pressed via Bluetooth. With switch control enabled on Android, iOS, or Chromebook, these inputs can be mapped to actions like ‘next’, ‘tap’, or media controls. Four 3D printed parts – case, lid, and two button caps – convert the built-in buttons into larger, more accessible ones by pressing directly onto them.
Explore the full MakerGuide, featuring a parts list, 3D printing guide, assembly steps, usage instructions, and tips for evolving the design.
Access the printable and editable design files, allowing you to both build and/or adapt the design.
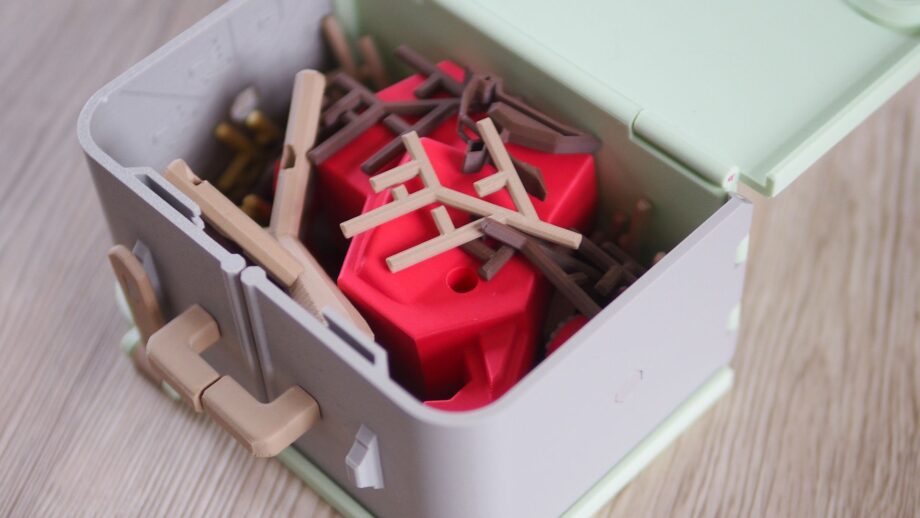
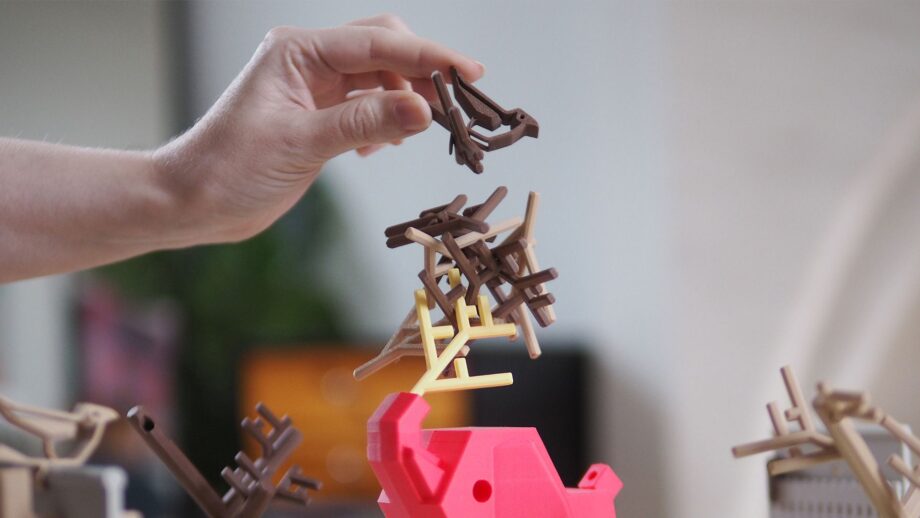
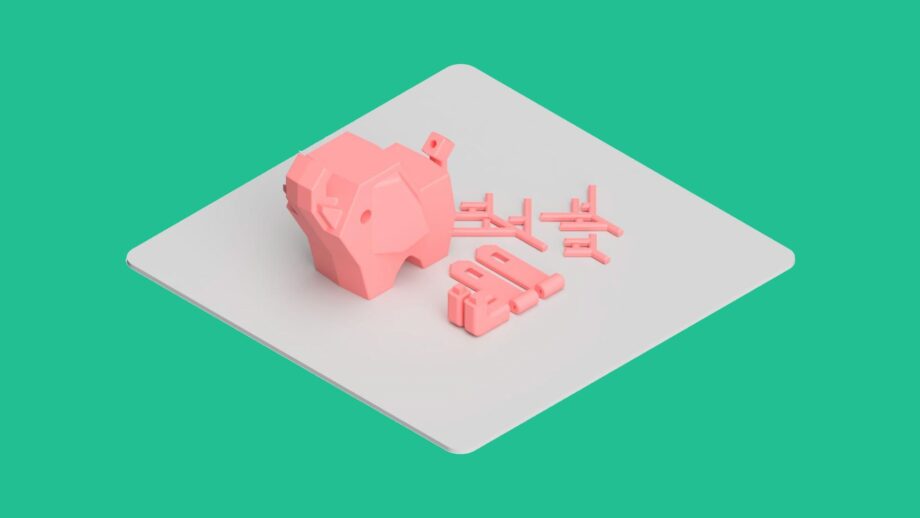
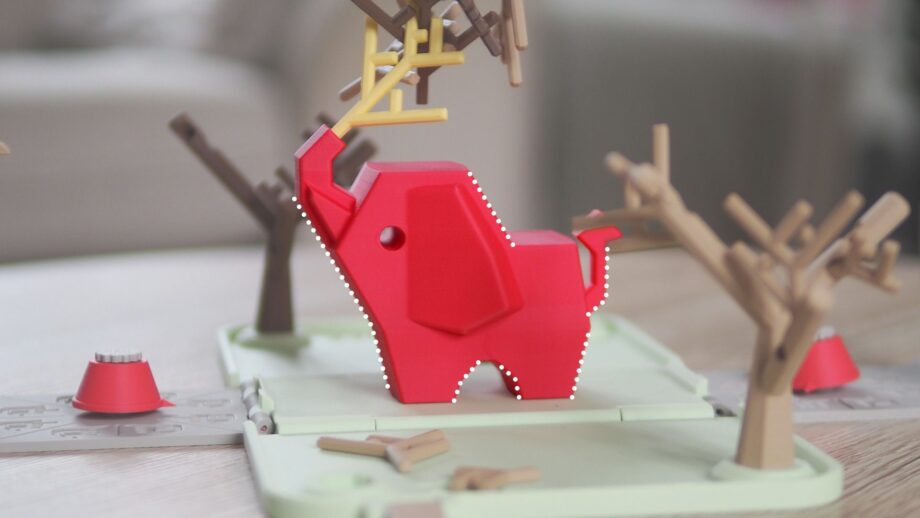
Pinchee is a fully 3D-printable, 2-player dexterity game where players pinch their bird to stack twigs on a cheerful elephant. Combining fun with finger and wrist exercises, it’s enjoyable for everyone and offers particular benefits for individuals with hand arthritis. Score points by stacking twigs and aim for victory in the high-stakes endgame!
Pinchee was designed for Cath, an end user with osteoarthritis in her hands, which makes it especially beneficial for people with arthritis — but it’s also a fun, engaging game for everyone.
Pinchee was created to make hand movement exercises fun and motivating. Instead of a clinical-looking aid, it turns therapy into play, helping improve dexterity and coordination through a joyful two-player game.
Research into arthritis-friendly hand exercises showed that gentle pinching movements help strengthen fingers and relieve stiffness. This insight inspired the idea of a playful “finger pinching” activity, which evolved through multiple prototypes into the final 3D printable game — combining therapy with fun.
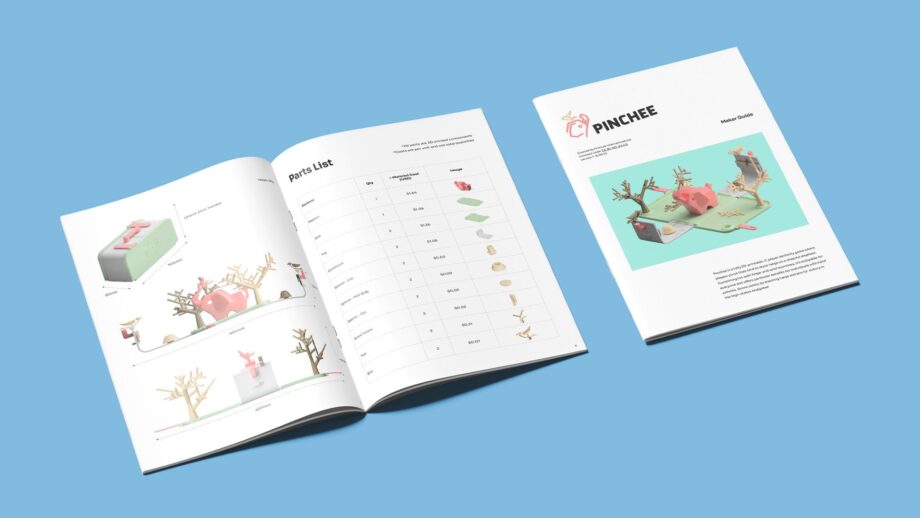
Explore the full MakerGuide, featuring a parts list, 3D printing guide, assembly steps, usage instructions, and tips for evolving the design.
Access the printable files, allowing you to build the design. Due to the complexity of Pinchee, we’re still refining the design files before release — coming soon!
Before preparing your design for open source sharing, it’s important to check and refine that it’s fully optimised. This means reviewing every detail — from how easily it can be printed and assembled, to how well it can be adapted, tested, and built upon by others. Look through the points below and refine your design before moving to the next step.
Ensure your design has open source potential by testing it with a wider range of end users. Gather feedback on comfort, usability, and real-world performance, then make targeted improvements to strengthen your design.
Refine your design to make assembly straightforward, repeatable, and easy to disassemble when needed. Where possible, avoid using glue and ensure the process is clear, reliable, and accessible for a wide range of makers.
If fixings or tools are required, use common, easily sourced options wherever possible. Standardising parts — such as screws, nuts, or electronic modules — makes it easier for others to reproduce, repair, and adapt your design anywhere in the world.
Refine your model to print successfully and efficiently on a variety of 3D printers. Check wall thicknesses, tolerances, bridges, and overhangs - aiming to reduce or remove the need for supports wherever possible.
Prepare clean, well-organised design files that others can easily open and adapt. Consider using parameters and clear naming to make it simple to adjust dimensions, components, or features without breaking the model.
Once the core design is refined, explore ways to expand its functionality or adapt it for different users. If relevant, consider creating optional modules, attachments, or variations that increase flexibility and encourage customisation.

Review your design to ensure it’s safe, comfortable, and ergonomic for the intended user. Avoid sharp edges and corners by adding fillets or chamfers, and if your product is designed for children, make sure there are no small detachable parts that could pose a risk.
Give your design a clear identity through branding. Simple product names, logos, and consistent colours and visuals help others recognise, remember, and connect with your work - especially when shared on open platforms.
The MakerGuide is your main resource for sharing your design openly. It’s a clear, visual document that guides others through every step of making and using your product. Using our editable Google Slides template, you’ll add images, diagrams, and short written sections covering your design overview, materials, 3D printing instructions, assembly, and use.
By completing a MakerGuide, you’ll not only create professional documentation ready for open source sharing – you’ll also develop valuable communication and presentation skills that help others understand and build upon your work. Watch the tutorial below to learn how to complete a MakerGuide, then download the editable template beneath the video to apply your learning to your own design.
Download the editable Google Slides MakerGuide template to create your own version. The download also includes completed MakerGuides for DRAG, Tap, and Pinchee - giving you real examples to reference as you build and present your design.
If you’d like to take your MakerGuide visuals to the next level, explore PrintLab’s Product Branding Course — available to view with a free trial. Learn how to create clean line diagrams and professional renders to make your documentation clear, consistent, and visually engaging.
Congratulations on reaching the final stage! You’re now ready to launch your design into the world. You can share your MakerGuide and files independently on 3D model repositories such as MakerWorld or Printables, or submit them to Team PrintLab using the form below.
By submitting to us, your work will be reviewed for potential sharing with global assistive technology organisations such as Makers Making Change, where selected designs may be downloaded, adapted, and used by people all over the world. A number of standout entries will be chosen to receive personalised support from Team PrintLab in preparing their designs for open source release.
Please note that ownership of all submitted work remains with the creators.